


A Bit of Context
Whether Linux or Windows, most of us are nostalgic for screensavers. They were not just there to provide any technical requirements but were also a form of art that we loved to enjoy. With time, the requirement for screensavers has faded away; of course, it's simply better to just blank the screen out anyway. But some of us still love the prospect of the screen turning into a lovely display of electronic art whenever we leave the computer for some time. If you're someone like me, then this tutorial will explain to you how to re-enable screensavers on Linux.
Before we proceed, I'd like to point out that in modern systems, it's probably useless to use a screensaver anyway. Most, if not all displays nowadays will turn themselves off when no signal is present. It's probably better for its durability anyway. On the other hand, it's much safer to just turn off the screen from a cybersecurity perspective. Therefore, please proceed with your caution and responsibility with this tutorial as we're dealing with old technology and we can't guarantee security or reliability. If you're unsure, leave your system as is. But for those of you who are willing to take the risk, let's proceed.
The XScreenSaver
Since its heydays, Linux has used XScreenSaver to provide the system with screensaver support. However, in 2011, gnome-screensaver version 3 dropped support for screensavers completely, supporting only simple screen blanking. Since then, we simply see the screen blanking itself after the allocated timeout.
However, development for XScreenSaver is still underway and can be easily done on Linux with just a few steps.
Installing the XScreenSaver
The first step is to install the XScreenSaver on your OS. I am using Ubuntu 23.10 and other Linux distros might have similar steps to what I'm following. In some Ubuntu distros, a program called gnome-screensaver might be present to handle screen blanking. It is important to remove this as it might interfere with the XScreenSaver. To do this, use the following command. In most modern distros, this simply will not even exist; but still, it's better to make sure.
sudo apt-get remove gnome-screensaver
The next step is to install the XScreenSaver along with its dependencies.
sudo apt-get install xscreensaver xscreensaver-data-extra xscreensaver-gl-extra
This is it! Now the OS will have screensaver support. However, some configurations might need to be done before we call it a day.
Changing a Few Settings
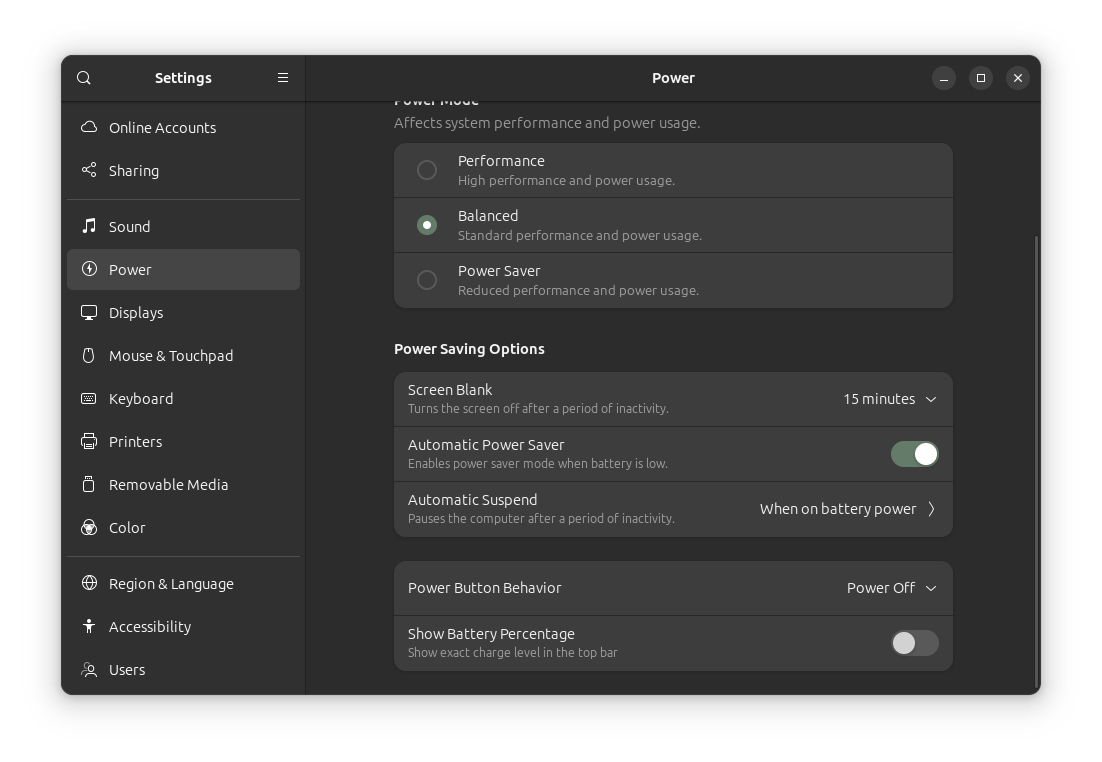
If your computer is set to blank after a certain time even when the screensaver is present, is not a good idea. So we will delay the screen blanking time. Go to Settings > Power and set the Screen Blank to 15 minutes. This will ensure that the screensaver has plenty of time before the system kicks in and turns off the screen. You can also set it to Never but I do not recommend it.
Configuring the XScreenSaver
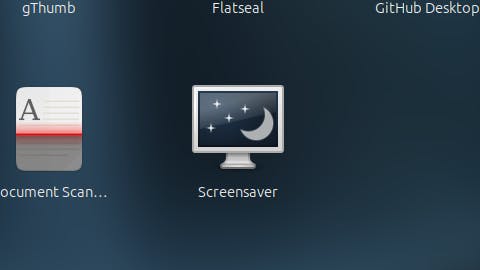
Out-of-the-box, XScreenSaver is set to start the screensaver after 10 minutes. It will choose a random screensaver and display it on the screen. We'd like to choose the screensaver we like to set as the screensaver. Doing this is easy! If you now check your app drawer, you will see a new app titled Screensaver.
Open this and you will see the XScreenSaver configuration page.
Sometimes, you might get a Warning such as the one given below:
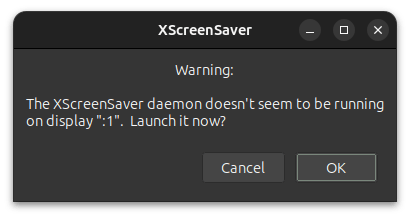
Hit OK and you will see a prompt like below:
This indicates that the screensaver daemon started.
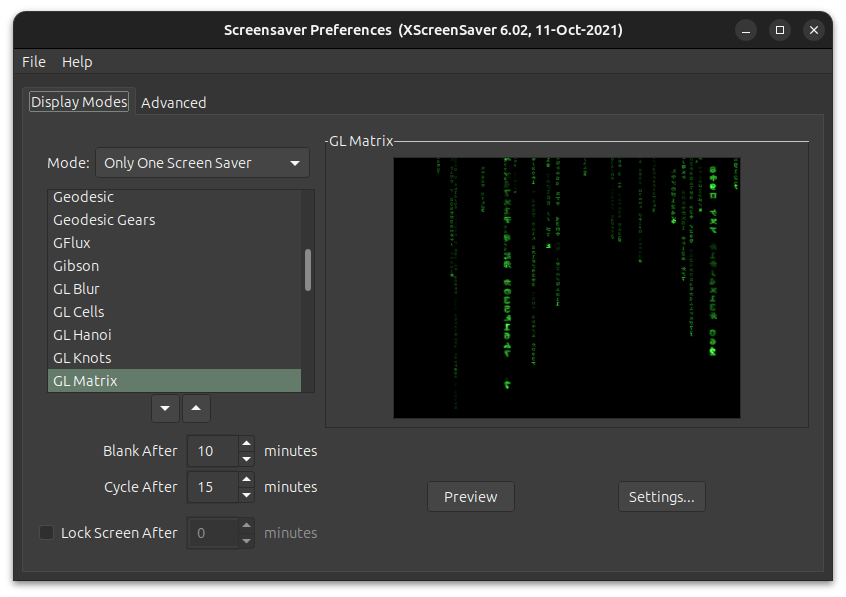
On the Screensaver Preferences page, we can change the preferences for our screensavers. Under Blank After, set the number of minutes after which to turn on the screensaver. Also, make sure to uncheck the Fade to Black when Blanking and Fade from Black When Unblanking options under Advanced > Blanking tab. Also, set the Fade Duration to 1 second or it takes too much time to show the screensaver.
The most important option, however, is the Mode: in the Display Modes tab. Change it to Only One Screen Saver to enable the screensaver selection. Now in the list below, you can choose your favourite screensaver as the default. Go through them and choose the ones that you prefer.
For me, the Preview button does not seem to do anything, however, if you prefer to preview the screensaver, simply click File > Blank Screen Now and the screensaver will be displayed on the display.
Optionally, you can change settings on certain screensavers by clicking on Settings.... Note that some screensavers might not have the option to change their settings.
Starting the XScreenSaver Daemon at Startup
If you restart your computer, you'll notice that even after the timeout, the screensaver might not start. The reason is that every time the computer restarts, the XScreenSaver daemon does not run automatically. We will do this by adding a startup entry.
To do this, open the Startup Applications from the app drawer and click on Add to create a new entry.

Under Name: give XScreensaver. Under Command: give xscreensaver -no-splash and under Comment: give Start screensaver daemon.Press Add and then Close to close the application.
Now, every time you restart the device, the XScreenSaver daemon will run automatically.
Fix a Little Inconvenience
If you use the screensaver for some time, you will notice that even when you watch a movie or a YouTube video, the screensaver starts. This can end up being annoying. Unfortunately, there's no proper way to prevent this. But, there's a small hack that we can do to make sure this doesn't happen in most cases.
The trick is to create a bash script that checks if an application is running full screen and disable the daemon if it sees one. This is only a partial fix as whenever you're playing a video without going full-screen, the screensaver will turn on regardless. We will have to deal with it, unfortunately. However, in most cases, we will be doing something on our computer while something is playing without the full-screen mode and it should be fine.
All kudos should go to Terrance on askubuntu.com for coming up with this ideal solution. The workaround below is from the answer he gave to a question titled When I watch a video online the screen turns off after a few minutes, with a few modifications on the terminal.
First, we will install xdotool.
sudo apt install xdotool
Then, we will create a folder to save our script.
mkdir -p ~/.scripts
In this folder, we will create a bash script file.
nano ~/.scripts/check_full.bsh
This will open a nano terminal to type the bash script. In it, paste the following script:
#!/bin/bash

#Get DPMS settings
dpms_set=$(xset -q | awk '/DPMS is/ {print $NF}')

#Get screensaver type and command
scrnsvr='/usr/bin/xscreensaver'
scrnsvrcmd='/usr/bin/xscreensaver -no-splash'

#Sleep Timer in seconds.
SL=300

while true;
do
result=()
#Get all window geometries
all=($(xdotool search --name - | while read win; do xdotool getwindowgeometry $win | awk '/Geometry/ {print $2}'; done))

#Get all screen resolutions detected and build array.
SCREENS=($(xrandr | awk '/\*/ {print $1}'))

SCRN=" ${SCREENS[*]} "

#Get result of all windows and match

for item in ${all[@]}; do if [[ $SCRN =~ " $item " ]] ; then result+=($item); fi; done

#If a result exists disable power management and screensaver
if [[ ${result[@]} ]]; then
    ps -ef | grep $scrnsvr | grep -v grep >/dev/null
    if [[ $? == 0 ]]; then
    kill $(ps -ef | grep $scrnsvr | grep -v grep | awk '{print $2}')
    fi
    if [[ $dpms_set == "Enabled" ]];then
    xset -dpms
    fi
else
    ps -ef | grep $scrnsvr | grep -v grep >/dev/null
    if [[ $? == 1 ]]; then
    ${scrnsvrcmd} &
    fi
    if [[ $dpms_set != "Disabled" ]];then
        xset dpms
        fi
fi
result=()
sleep $SL
done
You might need to change the SL=300 value depending on what the screensaver start time is set to. I have set it as 10 minutes; which is 600 seconds. So I chose this value to be 300 as it's half the screensaver start time. This allows the script to correctly detect the presence of a full-screen app without compromising performance.
Save this by pressing the key sequence Ctrl + X > Y > Enter.
Try running the script by entering the following command:
~/.scripts/check_full.bsh
If you get an error that looks like below:
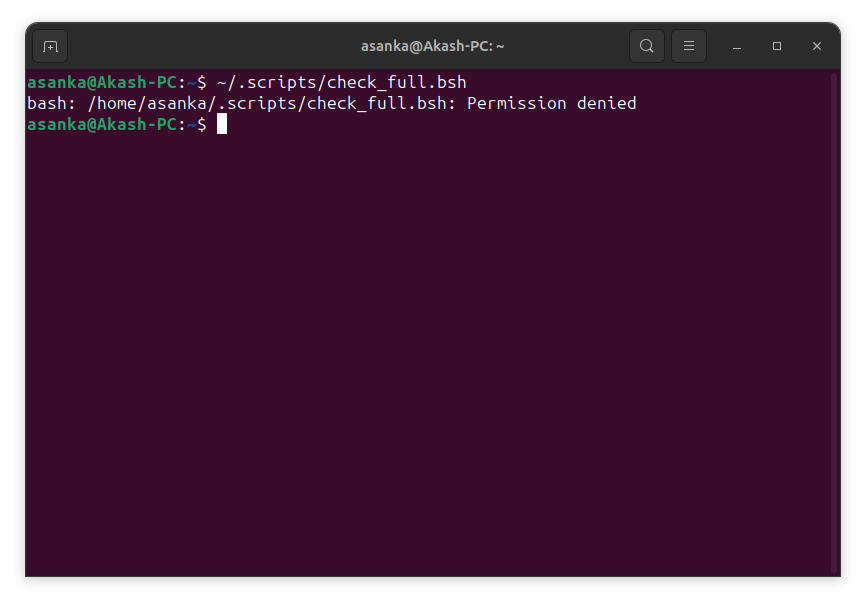
Enter the command:
chmod +x ~/.scripts/check_full.bsh
This will mark the script as executable. Now run the script again from the previous command and it should show like this:
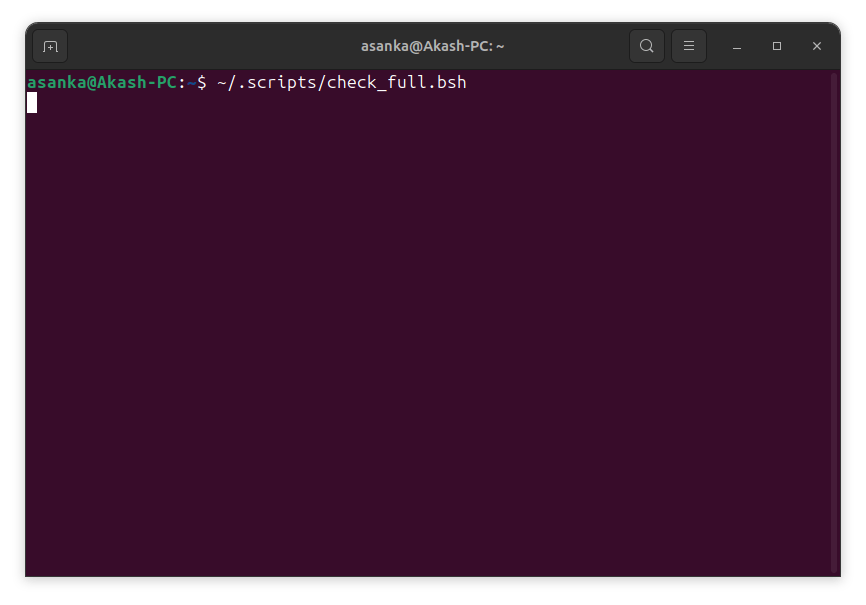
This indicates that the script is running and working. If it throws any errors, you will need to double-check the script.
You can press Ctrl + C and close the terminal.
Next, we will set this script to also start automatically every time we turn on the computer. As before, open the Startup Applications from the app drawer and click on Add to create a new entry. Under Name: give Check_Full. Under Command: give bash -c 'sleep 5 && /home/asanka/.scripts/check_full.bsh' and under Comment: give Prevent screensaver from activating when full screen video is playing. Press Add and then Close to close the application.
Now, every time you restart the device, the script to check for full-screen applications will run automatically.
Conclusion
Screensavers, once a well-known feature of retro computers, have seen their role fade away in the modern days. While their original purpose of preventing screen burn-in on CRT monitors is no longer relevant with today's displays, screensavers still have some benefits and will always hold a nostalgic charm for many of us enthusiasts.