

Floyd-Steinberg Dithering is not just a fancy art style; it also has practical applications in the real world. Introduced by Robert W. Floyd and Louis Steinberg in 1976, as the name implies, dithers the image. This is practically helpful in manipulating images. More colours can be created with a smaller colour palette. This is apparent in the example below provided by Wikipedia. The Floyd-Steinberg Dithered image looks much more natural because the dithering makes the missing colours in the palette appear in our brains.
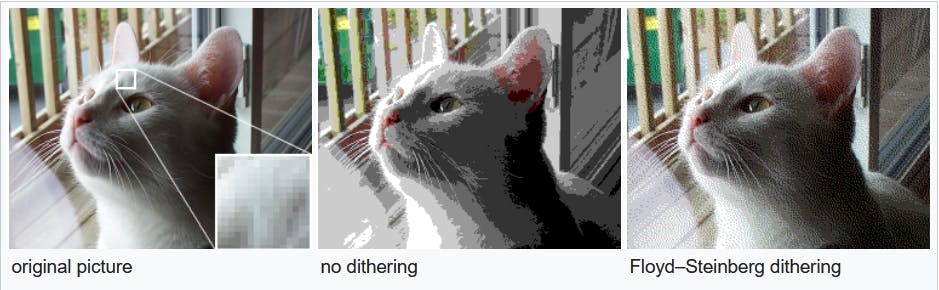 Comparision between no Dithering and Floyd Steinberg Dithering (Credit: wilipedia.com)
Floyd-Steinberg Dithering is applied to convert an image to the GIF format because the colour palette is limited to 256 colours.
The mechanic behind this is to push the residual quantization error of a pixel onto its neighbouring pixels: called Error Diffusion. This is done according to a distribution map that decides the intensity of the dithering.
In order to create a simple demonstration of Floyd-Steinberg Dithering, we'll start by defining the global variables.
PImage img;

int factor = 1;
boolean greyScale = false;

int[] xPos      = new int[]{+1, -1,  0, +1};
int[] yPos      = new int[]{ 0, +1, +1, +1};

int[] errFactor = new int[]{ 7,  3,  5,  1};
img will hold the image that we're loading to memory to be dithered. factor is the dithering factor which defines how intensive the dithering is or how many colours ranges we'll remove from the palette. greyScale is to switch between colour mode and greyscale. xPos and yPos store multiples to get the four neighbouring pixels of a given pixel. errFactor holds the four multiples to the error factor applied to each neighbouring pixel.
The setup is quite straightforward and we'll simply create the canvas and remove strokes. Make sure to create the canvas with the same pixel size as the image that you're using.
void setup() {
  size(1920, 1920);

  noStroke();
}
Next, we will define two functions. The first one is the index() function. It will accept the X and Y coordinates of a pixel and return the index of that pixel within the image. It will follow the standard equation: index = x value + (y value * width of the image).
int index(int x, int y) {
  return x + y * img.width;
}
The next function is the most important one as it will dither a given pixel. It will accept the index of the pixel we're working on, the image, the error calculated and the error factor which has to be applied. The task of this function is to calculate the new dithered value of each colour channel.
color dither(int index, PImage img, float[] err, int errFactor) {
  color c = img.pixels[index];

  float[] pixel = new float[]{red(c), green(c), blue(c)};

  for (int i = 0; i < 3; i++) {
    pixel[i] = pixel[i] + err[i] * errFactor / 16.0;
  }

  return color(pixel[0], pixel[1], pixel[2]);
}
Now we can move on to the main loop. We will start with loading our image to the img variable and loading the pixels. The next task is to iterate through each pixel and apply the dithering. For this, we'll use two nested loops to go through X and Y coordinates. For each pixel, we will then extract the R, G and B channel values and apply the dithering factor to round off any errors. With this, we can calculate how much this error is; or by how much the rounded-off value differs from the original. Then for each R, G and B channel, we will call the dither() function to dither that pixel. Now it's simply a matter of updating the pixels and drawing them on the canvas.
void draw() {
  img = loadImage("image.jpg");

  if(greyScale)
    img.filter(GRAY);

  img.loadPixels();

  for (int y = 0; y < img.height-1; y++) {
    for (int x = 1; x < img.width-1; x++) {

      color pix = img.pixels[index(x, y)];

      float[] oldPixel = new float[]{red(pix), green(pix), blue(pix)};

      float[] newPixel = new float[3];

      for (int i = 0; i < 3; i++) {
        newPixel[i] = round(factor * oldPixel[i] / 255) * (255/factor);
      }

      img.pixels[index(x, y)] = color(newPixel[0], newPixel[1], newPixel[2]);

      float[] err = new float[]{oldPixel[0] - newPixel[0], oldPixel[1] - newPixel[1], oldPixel[2] - newPixel[2]};

      for (int i = 0; i < 4; i++) {
        int index = index(x + xPos[i], y + yPos[i]);
        img.pixels[index] = dither(index, img, err, errFactor[i]);
      }

    }
  }

  img.updatePixels();
  image(img, 0, 0);

  noLoop();
}
With this we have Floyd-Steinberg Dithering implemented in processing. Change the factor value and see how it affects the dithering. The lower you go the more subtle the change will become. As a side addition, we'll program two features where when clicked, the image will switch from colour to greyscale and scrolling will change the factor.
void mouseWheel(MouseEvent event) {
  factor += event.getCount();

  if(factor < 1) {
    factor = 1;
  } else if (factor > 16) {
    factor = 16;
  }
  loop();
}

void mousePressed() {
  greyScale = !greyScale;
  loop();
}

External Links:
- Github Repository with the Processing Code: Github Repository
- Wikipedia article on Floyd Steinberg Dithering: Floyd–Steinberg dithering
- The Coding Train video on Floyd Steinberg Dithering: Coding Challenge #90: Floyd-Steinberg Dithering
- Computerphile video on Floyd Steinberg Dithering: Error Diffusion Dithering - Computerphile