

Introduction
Wave Function Collapse is a concept in Quantum Mechanics that states that a wave function reduces to a single eigenstate due to interaction with the external world. Simply speaking, the number of possibilities reduces with the introduction of new information. Think of a game show where a contestant is given the opportunity to guess a random animal out of 10 animals that the host has picked in their mind. Let's say one of the animals on the list is the lion. Before, the contestant has all 10 of the animals to choose from as a guess. However, as the first clue, the host says that the animal in their mind is not a lion. Now we definitely know that the guess is not a lion. (Unless of course, the host is lying 😜) Thus, the list of animals we have to guess out of reduced down to 9. This is essentially the concept we will tackle today.
I got the inspiration for this from a Coding Adventure The Coding Train did recently. In it, he introduces the concept of Wave Function Collapse which is used to develop an algorithm that can generate a new image out of bits and pieces of other images. Let's say we have multiple images or 'tiles'. These tiles have a pattern where one can only be placed in the neighbourhood of only a handful of other tiles. For example, maybe the 1st tile can only allow the 2nd or 5th tiles to be placed to the left of itself. In this case, the Wave Function Algorithm can come in handy.
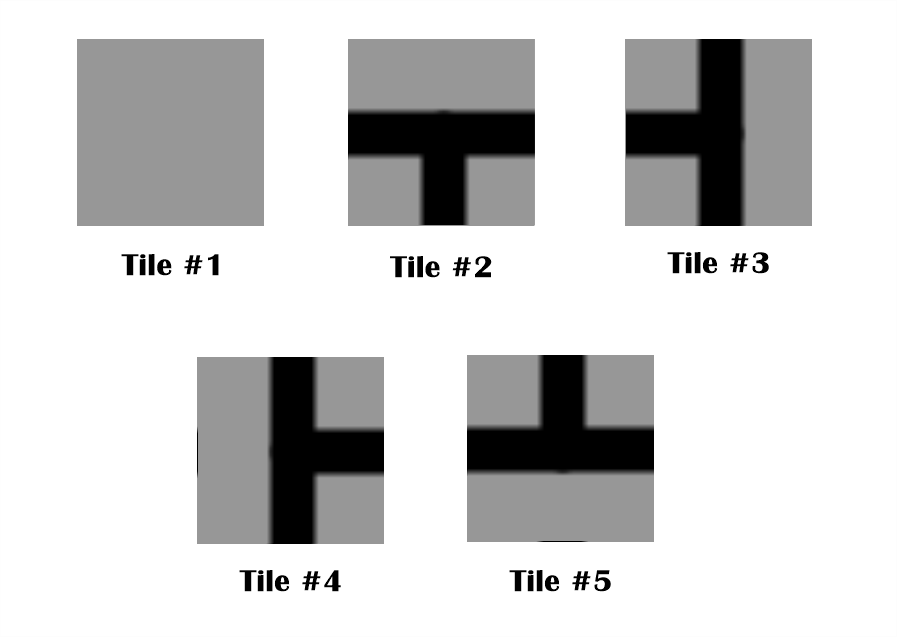
Let's start with a set of tiles. I have below the five tiles The Coding Train used in the video.
Defining the Rules
We can see that in order to stitch these tiles into an image, we need to define a set of rules for each side of the tile.
Tile #1:
      Top: Tile #1, Tile #5
      Bottom: Tile #0, Tile #1
      Left: Tile #0, Tile #2
      Right: Tile #0, Tile #3

Tile #2:
      Top: Tile #1, Tile #5
      Bottom: Tile #3, Tile #4, Tile #5
      Left: Tile #2, Tile #4, Tile #5
      Right:Tile #2, Tile #3, Tile #5

Tile #3:
      Top: Tile #2, Tile #3, Tile #4
      Bottom: Tile #3, Tile #4, Tile #5
      Left: Tile #2, Tile #4, Tile #5
      Right:Tile #1, Tile #4

Tile #4:
      Top: Tile #2, Tile #3, Tile #4
      Bottom: Tile #3, Tile #4, Tile #5
      Left: Tile #1, Tile #3
      Right:Tile #2, Tile #3, Tile #5

Tile #5:
      Top: Tile #2, Tile #3, Tile #4
      Bottom: Tile #1, Tile #2
      Left: Tile #2, Tile #3, Tile #4
      Right:Tile #2, Tile #3, Tile #5
Code
Tile as a Class
In order to make it easy for us, we will create a class called tile. This class will define a specific tile out of the tiles we defined under the rules. Each tile must have an ID which makes it easy to differentiate from the other tiles. It will have the image drawn as a tile on the canvas. Finally, it will have four integer arrays: TOPT, BOTTOMT, LEFTT, RIGHTT. These hold the IDs of the other tiles that are accepted by this tile in each of the four directions.
We will initialize a tile with these parameters and also define a function that simply draws it on screen.
class tile {
  int ID = 0;
  PImage ICON = null;
  int[] TOPT =  null;
  int[] BOTTOMT =  null;
  int[] LEFTT =  null;
  int[] RIGHTT =  null;

  tile(int _ID, PImage _ICON, int[] _TOPT, int[] _BOTTOMT, int[] _LEFTT, int[] _RIGHTT) {
    ID = _ID;
    ICON = _ICON;
    TOPT = _TOPT;
    BOTTOMT = _BOTTOMT;
    LEFTT = _LEFTT;
    RIGHTT = _RIGHTT;
  }

  void draw(int x, int y, int w, int h) {
    image(ICON, x, y, w, h);
  }
}
Initializing the Tile set
Next, we will write a function to load all the tiles in our tile set into the application as tile classes. In the example we're considering here, the function will be as follows.
tile[] setupTiles() {
  // Blank tile
  tile blankTile = new tile(
    0,
    loadImage("tiles/demo/blank.png"),
    new int[]{0, 4},
    new int[]{0, 1},
    new int[]{0, 2},
    new int[]{0, 3}
    );

  // Down tile
  tile downTile = new tile(
    1,
    loadImage("tiles/demo/down.png"),
    new int[]{0, 4},
    new int[]{2, 3, 4},
    new int[]{1, 3, 4},
    new int[]{1, 2, 4}
    );

  // Top tile
  tile leftTile = new tile(
    2,
    loadImage("tiles/demo/left.png"),
    new int[]{1, 2, 3},
    new int[]{2, 3, 4},
    new int[]{1, 3, 4},
    new int[]{0, 3}
    );

  // Right tile
  tile rightTile = new tile(
    3,
    loadImage("tiles/demo/right.png"),
    new int[]{1, 2, 3},
    new int[]{2, 3, 4},
    new int[]{0, 2},
    new int[]{1, 2 ,4}
    );

  // Up tile
  tile upTile = new tile(
    4,
    loadImage("tiles/demo/up.png"),
    new int[]{1, 2, 3},
    new int[]{0, 1},
    new int[]{1, 3, 4},
    new int[]{1, 2, 4}
    );

  return new tile[]{blankTile, downTile, leftTile, rightTile, upTile};
}
While we're at it, we will also define a function that returns all the IDs of the tiles we have. This will come in handy in the future.
int[] allTiles() {
  return new int[]{0, 1, 2, 3, 4};
}
Setup
Setup is as usual: We set the frame size to 600x600. We must make sure to keep it a perfect square to make the example simple. We will set the frame rate to 1 so that new designs don't zoom through in front of our eyes. If you want, you can add a noLoop() at the end to prevent new designs from spawning.
We will need four global variables: tiles, slots, tileSize and rowCount. Only the rowCount will be set by us and the rest of the variables will be set by the algorithm itself. rowCount is the number of cells we need for a row. This is also equal to the number of cells per row as well since the width and height of the canvas are the same. From this, we calculate the size of a single tile by tileSize = width / rowCount.
On the other hand, tiles will be populated by the algorithm by the tile set we load from the setupTiles() function: tiles = setupTiles(). The slots will hold all the slots available on the canvas for tiles. The algorithm will populate them one by one. Thus, we will simply initialize this by the number of cells we have: slots = new tile[rowCount * rowCount].
Draw
We will start by making the canvas black: background(0). First of all, we will have two for loops that iterate through the x and y coordinates of the tile slots we have on the screen. For each x and y position, we will get the accepted tile IDs towards the bottom of the upper slot and the right of the lefthand slot. If we don't have any tiles above or on the left-hand side, we get all the IDs we have available. For this, the allTiles() function can come in handy.
Out of the two possible tiles list, we will pick the common tiles that are available for us. We'll then pick one at random and add it to the slots and display it on the canvas. With this, we have an algorithm that performs Wave Function Collapse!
for (int i = 0; i < rowCount; i++) {
    for (int j = 0; j < rowCount; j++) {
      int[] leftPossible = null;
      int[] topPossible = null;

      if (i == 0) {
        leftPossible = allTiles();
      } else {
        leftPossible = slots[j * rowCount + i - 1].RIGHTT;
      }

      if (j == 0) {
        topPossible = allTiles();
      } else {
        topPossible = slots[(j - 1) * rowCount + i].BOTTOMT;
      }

      ArrayList<Integer> commonPossible = getCommons(leftPossible, topPossible);

      slots[j * rowCount + i] = tiles[commonPossible.get((int)random(commonPossible.size()))];
      slots[j * rowCount + i].draw(i * tileSize, j * tileSize, tileSize, tileSize);
    }
  }
Picking the Common Tiles
In order to pick the common tiles from the two lists, we will write a simple function. This will accept the two lists and then iterate through one of them and compare itself with the items on the other list. If it finds itself on the other list, it will add itself to the new list and exit the inner loop. The outer loop will continue on for all the items in itself.
ArrayList<Integer> getCommons(int[] list1, int[] list2) {
  ArrayList<Integer> common = new ArrayList<Integer>();

  for(int item1:list1) {
    for(int item2:list2) {
      if (item1 == item2) {
        common.add(item1);
        break;
      }
    }
  }

  return common;
}
Conclusion
Wave Function Algorithm is an interesting algorithm. It shows us that with a few simple sets of rules, we can create complicated behaviours. If we change the set of tiles to even more complicated ones, we can get mesmerizing results. As usual, you can find the code in the Github Repository. I have also included the tile sets The Coding Train included in their example. Make sure to check out his video on the subject as well.
External Links:
- Github Repository with the Processing Code: Github Repository
- Wikipedia article on Perlin Noise: wikipedia.org
- The Coding Train video on Wave Function Collapse: youtube.com